表情
Face Mesh
你将学到什么
- 自定义 ShaderMaterial / 修改内置 shader
- 相机交互控制器
- 天空盒与环境贴图
- requestAnimationFrame 渲染循环
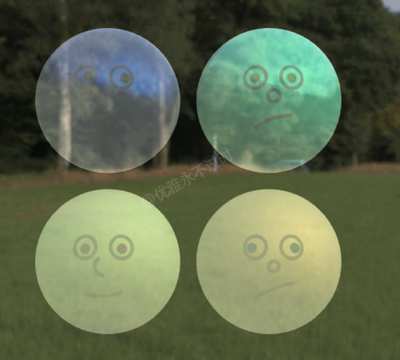
效果说明
Three.js 业务向场景组合。
应用场景 · Three.js
核心概念
ShaderMaterial 完全自定义 GLSL;
onBeforeCompile可在内置材质 shader 中注入代码。关注uniforms与 rAF 更新。OrbitControls 轨道旋转缩放;开
enableDamping时每帧需controls.update()。CubeTexture 六面贴图作
scene.background;scene.environment供 PBR 材质反射。
实现步骤
- 搭建 Scene / Camera / Renderer 与 OrbitControls
- 定义材质/shader 与 uniforms,rAF 中更新
- rAF 循环中 update 并 render
代码要点
generateSilly()— 案例中的独立逻辑模块,建议在线编辑器中跳转阅读drawMouth()— 案例中的独立逻辑模块,建议在线编辑器中跳转阅读drawNose()— 案例中的独立逻辑模块,建议在线编辑器中跳转阅读drawEyes()— 案例中的独立逻辑模块,建议在线编辑器中跳转阅读
源码
js
import * as THREE from "three";
import { OrbitControls } from "three/addons/controls/OrbitControls.js";

const scene = new THREE.Scene()

const camera = new THREE.PerspectiveCamera(30, innerWidth / innerHeight, 1, 1000)

camera.position.set(0, 0, 15)

const renderer = new THREE.WebGLRenderer({ antialias: true })

renderer.setSize(innerWidth, innerHeight)

document.body.appendChild(renderer.domElement)

const controls = new OrbitControls(camera, renderer.domElement)

controls.enableDamping = true

const atlasSize = new THREE.Vector2(2, 2)

renderer.setAnimationLoop(() => {

    controls.update()

    renderer.render(scene, camera)

})

const urls = [0, 1, 2, 3, 4, 5].map(k => ('https://z2586300277.github.io/three-editor/dist/files/scene/skyBox8/' + (k + 1) + '.png'));

const textureCube = new THREE.CubeTextureLoader().load(urls)

scene.background = textureCube

const atlas = ((dim) => {
    const c = document.createElement("canvas");
    const tileSize = 256;
    c.width = tileSize * dim.x;
    c.height = tileSize * dim.y;
    const u = (val) => tileSize * 0.01 * val;
    const ctx = c.getContext("2d");

    ctx.fillStyle = "rgba(255, 255, 255, 1)";
    ctx.fillRect(0, 0, c.width, c.height);

    for (let y = 0; y < dim.y; y++) {
        for (let x = 0; x < dim.x; x++) {
            generateSilly(x, y);
        }
    }

    const tex = new THREE.CanvasTexture(c);
    tex.colorSpace = "srgb";
    tex.anisotropy = renderer.capabilities.getMaxAnisotropy();
    return tex;

    function generateSilly(x, y) {
        ctx.save();
        ctx.translate((x + 0.5) * tileSize, (y + 0.5) * tileSize);
        // eyes
        ctx.lineWidth = u(5);
        ctx.lineCap = "round";
        ctx.strokeStyle = "rgba(127, 127, 127, 1)";
        drawEyes(25, -25, 15);
        drawNose();
        drawMouth();
        ctx.restore();
    }

    function drawMouth() {
        let p1 = [-25, Math.random() * 25];
        let p2 = [-10 + Math.random() * 20, Math.random() * 25];
        let p3 = [25, Math.random() * 25];
        ctx.beginPath();
        let yShift = 20;
        ctx.moveTo(u(p1[0]), u(yShift + p1[1]));
        ctx.quadraticCurveTo(
            u(p2[0]),
            u(yShift + p2[1]),
            u(p3[0]),
            u(yShift + p3[1])
        );
        ctx.stroke();
    }

    function drawNose() {
        ctx.beginPath();
        let arcStart = Math.random() * Math.PI * 2;
        let arcEnd = arcStart + (Math.random() * 0.75 + 0.25) * Math.PI * 2;
        ctx.arc(0, 0, u(Math.random() * 10 + 5), arcStart, arcEnd);
        ctx.stroke();
    }

    function drawEyes(x, y, radius) {
        let eyeSymmX = Math.sign(Math.random() - 0.5);
        let eyeSymmY = Math.sign(Math.random() - 0.5);
        //left
        ctx.fillStyle = "rgba(255, 255, 255, 1)";
        ctx.beginPath();
        ctx.arc(-u(x), u(y), u(radius), 0, Math.PI * 2);
        ctx.fill();
        ctx.stroke();
        // pupil
        let dir = [Math.random() - 0.5, Math.random() - 0.5];
        let dirL = Math.hypot(dir[0], dir[1]);
        let dirN = [dir[0] / dirL, dir[1] / dirL];
        let pupilShift = Math.random() * 5;
        let finalDir = { x: dirN[0] * pupilShift, y: dirN[1] * pupilShift };
        let pupilR = 7;
        let pupilColor = `hsla(${Math.random() * 360}, 100%, 25%, 1)`;
        //console.log(finalDir);
        ctx.fillStyle = pupilColor;
        ctx.beginPath();
        ctx.arc(-u(x + finalDir.x), u(y + finalDir.y), u(pupilR), 0, Math.PI * 2);
        ctx.fill();

        // right
        ctx.fillStyle = "rgba(255, 255, 255, 1)";
        ctx.beginPath();
// ... 完整源码见在线案例编辑器
小结
应用场景 · Three.js