
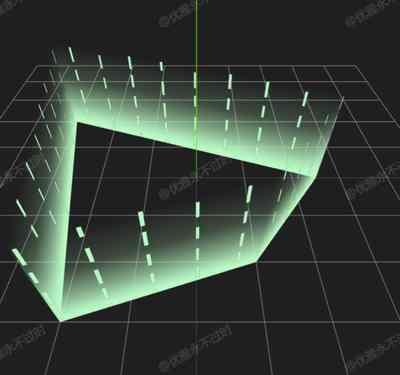
流动围栏
Sport Fence
你将学到什么
- 相机交互控制器
- requestAnimationFrame 渲染循环
- GUI 面板调试参数
效果说明
Three.js 业务向场景组合。
应用场景 · Three.js
核心概念
- OrbitControls 轨道旋转缩放;开
enableDamping时每帧需controls.update()。
实现步骤
- 搭建 Scene / Camera / Renderer 与 OrbitControls
- rAF 循环中 update 并 render
代码要点
createFenceGeometry()— 案例中的独立逻辑模块,建议在线编辑器中跳转阅读
源码
js
import * as THREE from 'three'
import { OrbitControls } from 'three/examples/jsm/controls/OrbitControls.js'
import { GUI } from 'three/examples/jsm/libs/lil-gui.module.min.js'

const box = document.getElementById('box')

const scene = new THREE.Scene()

const camera = new THREE.PerspectiveCamera(75, box.clientWidth / box.clientHeight, 0.1, 100000)

camera.position.set(0, 50, 50)

const renderer = new THREE.WebGLRenderer({ antialias: true, alpha: true, logarithmicDepthBuffer: true })

renderer.setSize(box.clientWidth, box.clientHeight)

box.appendChild(renderer.domElement)

new OrbitControls(camera, renderer.domElement)

scene.add(new THREE.AxesHelper(100), new THREE.GridHelper(100, 10))

const points = [
    new THREE.Vector3(10, 0, 20),
    new THREE.Vector3(25, 0, 0),
    new THREE.Vector3(-30, 0, -20),
    new THREE.Vector3(-20, 0, 30),
];

const height = 20;
const fenceGeometry = createFenceGeometry(points, height);

const color = new THREE.Color(0xb9f9c3);

const material = new THREE.MeshBasicMaterial({
    color,
    transparent: true,
    side: THREE.DoubleSide,
    map: new THREE.TextureLoader().load(FILE_HOST + 'images/channels/wall_g.png')
});
const fence = new THREE.Mesh(fenceGeometry, material);
scene.add(fence);

const texture = new THREE.TextureLoader().load(FILE_HOST + 'images/channels/wall_line.png')
texture.wrapS = THREE.RepeatWrapping;
texture.wrapT = THREE.RepeatWrapping;
texture.repeat.x = 2

const fence2 = new THREE.Mesh(fenceGeometry.clone(), new THREE.MeshBasicMaterial({
    color,
    map: texture,
    transparent: true,
    side: THREE.DoubleSide,
}));
scene.add(fence2);

function createFenceGeometry(points, height) {
    const positions = [];
    const uvs = [];
    const indices = [];

    let totalLength = 0;
    for (let i = 0; i < points.length; i++) {
        const current = points[i];
        const next = points[(i + 1) % points.length];
        totalLength += current.distanceTo(next);
    }

    let currentLength = 0;

    for (let i = 0; i < points.length; i++) {
        const current = points[i];
        const next = points[(i + 1) % points.length];

        const segmentLength = current.distanceTo(next);

        positions.push(
            current.x, current.y, current.z,
            next.x, next.y, next.z
        );

        positions.push(
            next.x, current.y + height, next.z,
            current.x, current.y + height, current.z
        );

        const segmentUStart = currentLength / totalLength;
        const segmentUEnd = (currentLength + segmentLength) / totalLength;
        uvs.push(
            segmentUStart * 2, 0,
            segmentUEnd * 2, 0,
            segmentUEnd * 2, 1,
            segmentUStart * 2, 1
        );

        const vertexOffset = i * 4;
        indices.push(
            vertexOffset, vertexOffset + 1, vertexOffset + 2,
            vertexOffset, vertexOffset + 2, vertexOffset + 3
        );
        currentLength += segmentLength;
    }

    const geometry = new THREE.BufferGeometry();
    geometry.setAttribute('position', new THREE.Float32BufferAttribute(positions, 3));
    geometry.setAttribute('uv', new THREE.Float32BufferAttribute(uvs, 2));
    geometry.setIndex(indices);
    geometry.computeVertexNormals();
    return geometry;
}

animate()

function animate() {
    texture.offset.y -= 0.005;
    requestAnimationFrame(animate)
    renderer.render(scene, camera)
}

window.onresize = () => {
// ... 完整源码见在线案例编辑器
小结
应用场景 · Three.js