
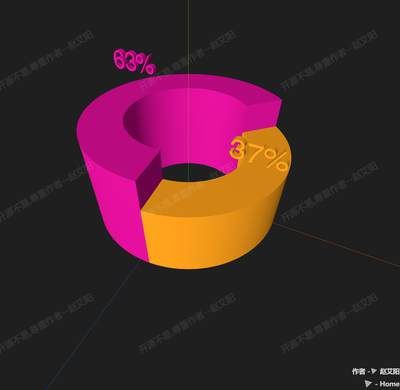
3D饼图
3D Pie
你将学到什么
- 相机交互控制器
- requestAnimationFrame 渲染循环
效果说明
Three.js 业务向场景组合。
应用场景 · Three.js
核心概念
- OrbitControls 轨道旋转缩放;开
enableDamping时每帧需controls.update()。
实现步骤
- 搭建 Scene / Camera / Renderer 与 OrbitControls
- rAF 循环中 update 并 render
代码要点
createPieBlock()— 案例中的独立逻辑模块,建议在线编辑器中跳转阅读h()— 案例中的独立逻辑模块,建议在线编辑器中跳转阅读
源码
js
import * as THREE from "three";
import { OrbitControls } from "three/addons/controls/OrbitControls.js";
import { FontLoader } from 'three/examples/jsm/loaders/FontLoader.js'
import { TextGeometry } from 'three/examples/jsm/geometries/TextGeometry.js'

// 创建渲染器
var renderer = new THREE.WebGLRenderer({ antialias: true, alpha: true, logarithmicDepthBuffer: true });
// 设置canvas画布大小为窗口
renderer.setSize(window.innerWidth, window.innerHeight);
renderer.setPixelRatio(window.devicePixelRatio * 2); // 设置像素比
document.body.appendChild(renderer.domElement); // canvas画布插入dom树

// 创建场景
var scene = new THREE.Scene();

// 辅助线
var axisHelper = new THREE.AxesHelper(500);
scene.add(axisHelper);

// 添加点光源
let light1 = new THREE.PointLight("#fff", 3, 0, 0);
light1.position.set(0, 1160, 2160);
scene.add(light1);

//环境光
let ambient = new THREE.AmbientLight("#fff", 0.6);
scene.add(ambient);

// 创建相机
var camera = new THREE.PerspectiveCamera(70, window.innerWidth / window.innerHeight, 0.1, 4000);
camera.position.set(70, 230, 230); // 设置相机位置

// 创建控制器
let controls = new OrbitControls(camera, renderer.domElement);

// 渲染
!(function render() {
  controls.update(); // Update controls
  renderer.render(scene, camera);
  requestAnimationFrame(render);
})();

// 字体加载器
const fontUrl = FILE_HOST + 'files/json/font.json'
new FontLoader().load(fontUrl, function (font) {
  const group = new THREE.Group();
  group.rotateX(-(Math.PI / 180) * 90);
  scene.add(group);

  const outR = 100; // 外半径
  const innerR = 60; // 内半径
  const startAngle = 45; // 起始位置

  const h1 = 100; // 高度
  const color1 = 0xe20f9f; // 颜色
  let angleLength1 = 160; // 长度

  const h2 = 70; // 高度
  const color2 = 0xffa500; // 颜色

  // 创建图块
  function createPieBlock(outR, innerR, h, startAngle, angleLength, color, rateText) {
    // 形状
    const shape = new THREE.Shape();
    shape.absarc(0, 0, outR, (Math.PI / 180) * startAngle, (Math.PI / 180) * (startAngle + angleLength));
    shape.lineTo(shape.currentPoint.x * (innerR / outR), shape.currentPoint.y * (innerR / outR));
    shape.absarc(0, 0, innerR, (Math.PI / 180) * (startAngle + angleLength), (Math.PI / 180) * startAngle, true);

    // 冲压几何体配置
    const extrudeSettings = {
      curveSegments: 100,
      steps: 2,
      depth: h,
      bevelEnabled: true,
      bevelThickness: 1,
      bevelSize: 0,
      bevelOffset: 0,
      bevelSegments: 1,
    };

    // 创建几何体、材质、物体
    const geometry = new THREE.ExtrudeGeometry(shape, extrudeSettings);
    const material = new THREE.MeshLambertMaterial({
      color: color,
      //side: THREE.DoubleSide,
      /* opacity: 0.7,
  transparent: true,
  depthWrite: false, */
    });
    const mesh = new THREE.Mesh(geometry, material);
    group.add(mesh);

    // 创建文字
    const textGeometry = new TextGeometry(rateText, {
      font: font,
      size: 18,
      depth: 5.5,
    });
    const textMaterial = new THREE.MeshPhongMaterial({ color: color });
    const text = new THREE.Mesh(textGeometry, textMaterial);

    // 旋转
    text.rotateX((Math.PI / 180) * 90);
    //text.rotateY((Math.PI / 180) * (startAngle + angleLength / 2 - 90));
    text.updateMatrix(); // 更新矩阵

    // 包围盒
    textGeometry.computeBoundingBox();
    const { max, min } = textGeometry.boundingBox;
    // 包围盒中心
    const textCenter = new THREE.Vector3((max.x - min.x) / 2, (max.y - min.y) / 2, (max.z - min.z) / 2);
    textCenter.applyMatrix4(text.matrix.clone());
    // 目标位置
    const targetPostion = new THREE.Vector3(
      Math.cos((Math.PI / 180) * (startAngle + angleLength / 2)) * (innerR + (outR - innerR) / 2),
      Math.sin((Math.PI / 180) * (startAngle + angleLength / 2)) * (innerR + (outR - innerR) / 2),
      h + 30
    );
    // 移动
    text.position.add(targetPostion.sub(textCenter));
// ... 完整源码见在线案例编辑器
小结
应用场景 · Three.js